
I spend more time today than ever before interacting with terminal windows, which is something I don’t think Past Me would have believed in the early ’90s. Back then, poor MS-DOS was the staid whipping boy of the industry, and at least on the consumer side, graphical environments like Windows (and maybe even odder creatures like AmigaOS) seemed poised to stamp the command line into oblivion, leaving text interfaces behind as we all blasted into the ooey-GUI future.
As it turns out, though, the command line is still the best tool for some jobs—many jobs, in fact. I read a wise post some years ago (probably on Slashdot) arguing that a mouse-driven point-and-click interface essentially reduces the user to pointing at something on the screen and grunting, “DO! DO THAT!” at the computer. (The rise of right-click context menus adds the ability for the user to also grunt “MORE THINGS!” but doesn’t otherwise add vocabulary.)
The command line, by contrast, gives the user the opportunity to precisely tell the computer what they want done, using words instead of one or two gestalts that the computer must interpret based on context.
It sounds kind of silly to say it, but the command line is what finally dragged me off Windows as my daily driver back in 2007. At the time, I’d been forced into regular bash usage at work as I took over the day-to-day administration of Boeing Houston’s fleet of then-brand-new EMC Celerra NSX enterprise NAS appliances, and while there were GUI management options available (I am perhaps triggering trauma in a small subset of older readers by saying the words “EMC Control Center”), the environment I’d inherited was firmly held together by bash scripts.
At first, I had turned up my nose at the Linux-ness of it all, but kind of like the fungus in The Last of Us, the shell’s tendrils slowly infected my brain. I began to realize that sad old cmd.exe and MS-DOS batch files really were kind of terrible, and that maybe, just maybe, the Linux-y ravings of my angry graybeard sysadmin mentor were not as crazy as they seemed.
I didn’t think I’d ever arrive at his method of only running manually compiled Slackware—and, indeed, 20 years on, I’m still not even close—but the guy had a point. The more I used a Unix-y shell at work, the more I began to miss it at home. Windows Vista and its early WDDM woes had reduced my previously badass main PC with two Nvidia 7900GT cards in SLI to a stuttering BSOD-spitting mess, and the future of Microsoft OSes looked bleak—Windows 7 wouldn’t be along to change the situation for years.
Exposure therapy to the bash shell brought me to the tipping point, and I jumped ship to the Macintosh side of the house. It was a move calculated to give me the best of all possible worlds—a good graphical interface with the same bash shell under the hood that I’d come to depend on at work.
I haven’t looked back. These days, I run three different operating systems at home. MacOS is still my daily driver on the desktop; Windows lives on the gaming PC in the corner; and Linux (in the form of Ubuntu server LTS) is headless in the closet, where it belongs. God is in his heaven, and all is right with my computing world—and still, as with every day since sometime in early 2007, I spend at least an hour or two with a terminal window doing things the old-fashioned, text-y way.
The fish shell long ago became my default on my Mac, in no small part because I like fish’s colors and find them helpful (don’t judge me!). When I’m logged into Linux, though, I stick with good old bash. I know zsh and other modern alternatives have their fans, but I’ve found my happy place, and I’m content to stay there.
Being a child of the BBS era, when ANSI graphics were the hotness, I have spent about as much time as any other terminal-enjoying admin customizing my environment and making it into a place where I feel comfy working.
… Oh God, I’m doing it. I’m doing the thing they do on recipe sites where all the reader really wants is directions for making pecan pie but instead gets a giant personal backstory. Forgive me. I’m old. Let’s get to the pie, and by pie, I mean the screenshots and code!
My favorite thing: The terminal timer
It’s incredibly handy, at least for me, to have an easy-to-see reference of how long the last command took to run. (You don’t need that kind of thing until you need it, and then you often really need it.) To that end, I have some functions living in my .bashrc file that time each command and then append that time—and the last error code emitted—to the next bash prompt. In practice, it looks like this:
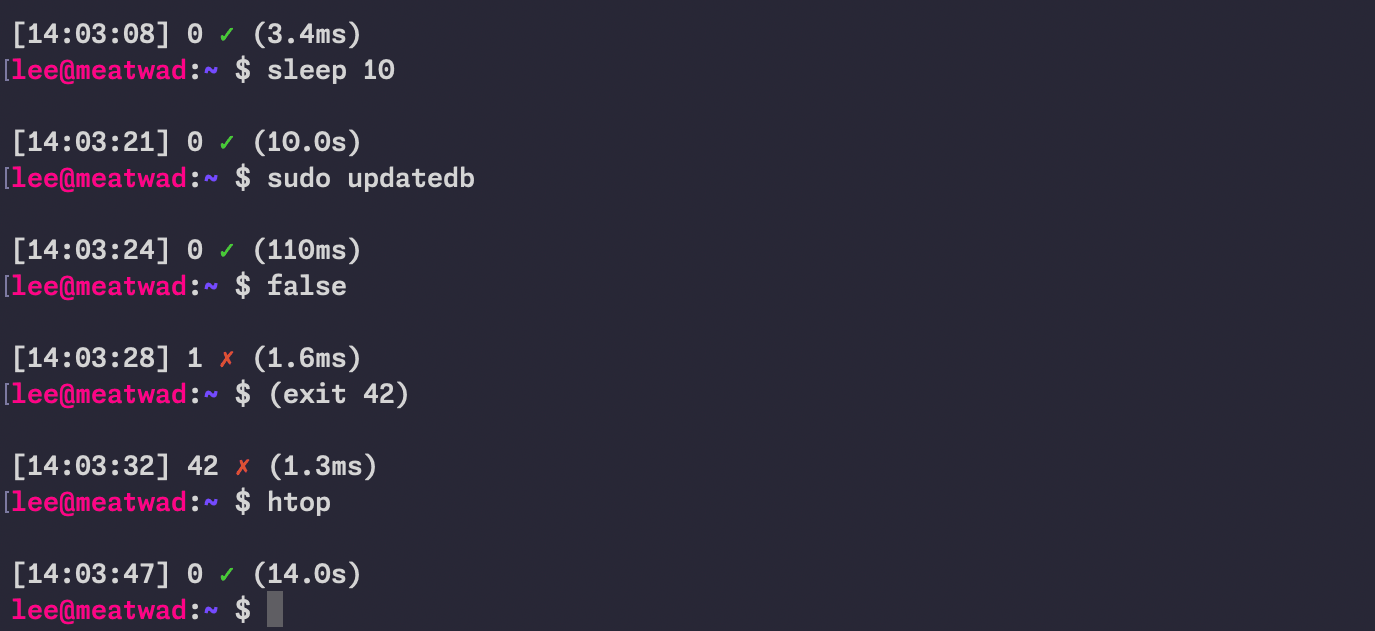
I dig this. Coupled with printing the current time as part of the prompt, it gives you a good idea of not just how long the last few commands took to run but also when you were running them. That’s very handy for absentminded admins (/me raises hand) who leave terminal sessions up for days at a time with important work sitting in them.
Here’s the code to make this happen, which you should feel free to adapt to your needs. As noted, I keep this in .bashrc as part of my PS1 prompt statement:
color_prompt=yes if [ "$color_prompt" = yes ]; then function timer_now { date +%s%N } function timer_start { timer_start=${timer_start:-$(timer_now)} } function timer_stop { local delta_us=$((($(timer_now) - $timer_start) / 1000)) local us=$((delta_us % 1000)) local ms=$(((delta_us / 1000) % 1000)) local s=$(((delta_us / 1000000) % 60)) local m=$(((delta_us / 60000000) % 60)) local h=$((delta_us / 3600000000)) if ((h > 0)); then timer_show=${h}h${m}m elif ((m > 0)); then timer_show=${m}m${s}s elif ((s >= 10)); then timer_show=${s}.$((ms / 100))s elif ((s > 0)); then timer_show=${s}.$(printf %03d $ms)s elif ((ms >= 100)); then timer_show=${ms}ms elif ((ms > 0)); then timer_show=${ms}.$((us / 100))ms else timer_show=${us}us fi unset timer_start } function set_prompt { Last_Command=$? FancyX='342234227' Checkmark='342234223' export PS1="n$WHITE[t] " if [[ $Last_Command == 0 ]]; then PS1+="$? $GREEN$Checkmark " else PS1+="$? $RED$FancyX " fi timer_stop PS1+="$WHITE($timer_show)" PS1+="n[$HOSTCOLOR]u@h[$WHITE]:[$BLUEBOLD]w[$WHITE] \$ " } trap 'timer_start' DEBUG PROMPT_COMMAND='set_prompt' fiThis mess of functions will jam all that goodness into your prompt, complete with a fancy green “check” if the program exited with error code 0 or a red “X” and the error code if it exited with something else. The color definitions—$WHITE, $BLUEBOLD, $HOSTCOLOR, and others—are just plain ol’ ANSI escape sequences defined elsewhere in .bashrc and not presented here to try to keep the code excerpts from being too long. You can and should replace them with whatever tickles your fancy.
The timer_stop function also has the job of converting the timer into a human-readable format, and it’s probably messier than it needs to be. I’m no developer, though, so this is what Past Lee settled on after a few hours of searching through examples.
Doing it in fish for folks like me
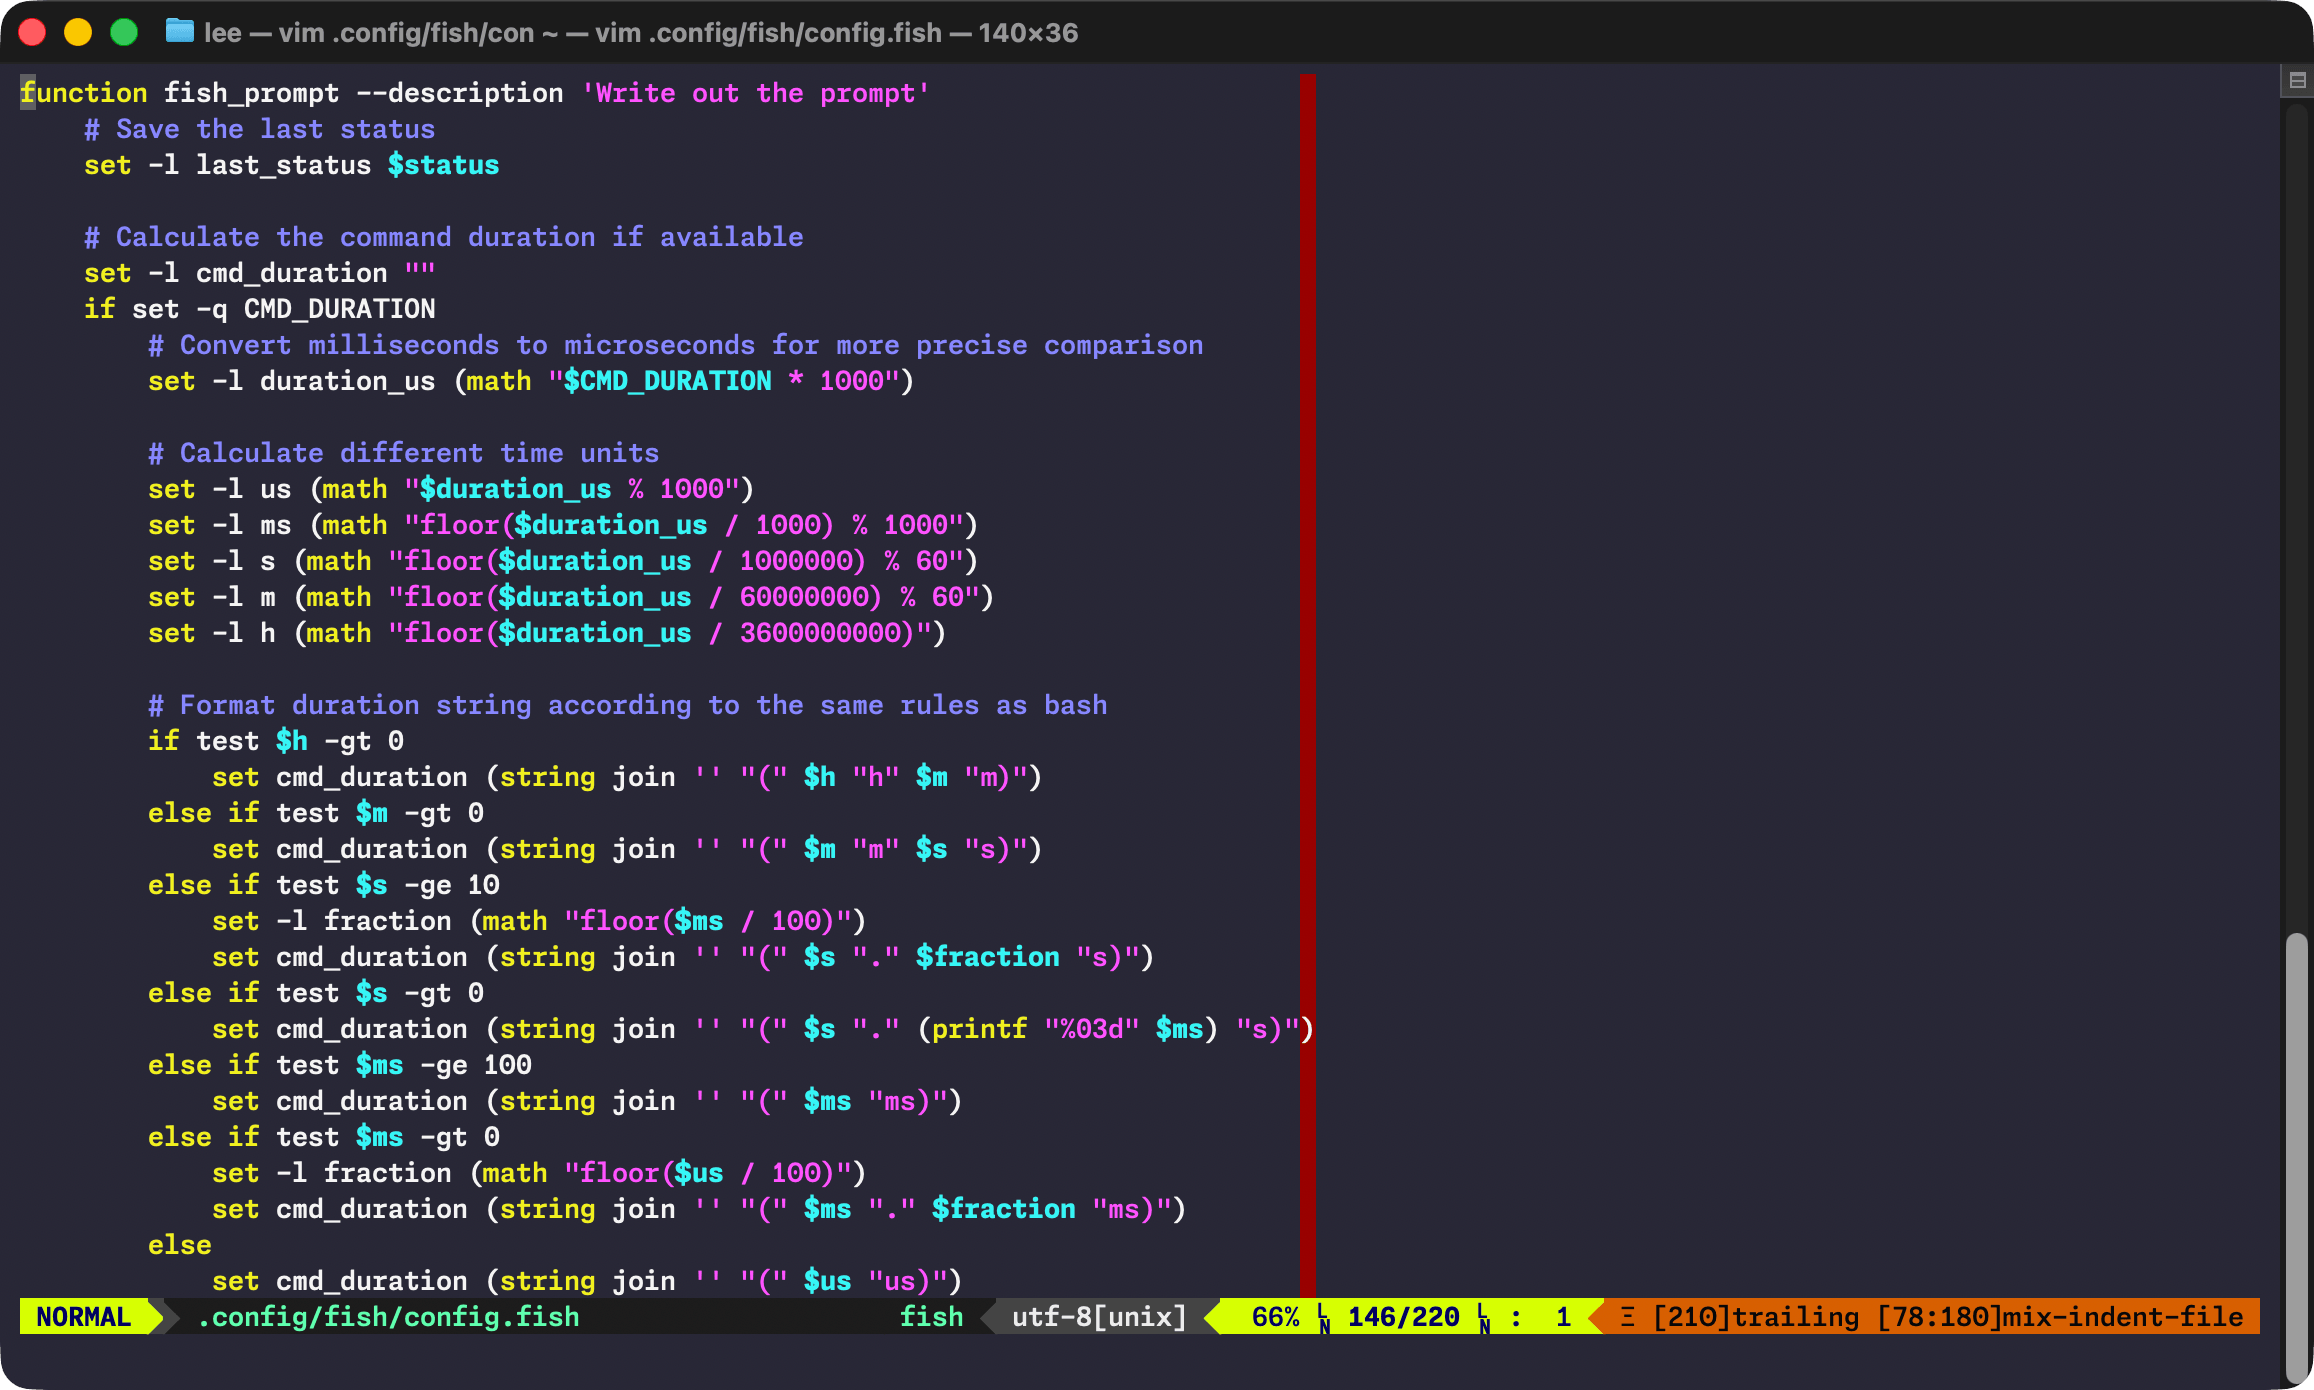
That’s for bash when I’m ssh’d into one of my Linux hosts, but I run fish on MacOS. I have a separate fish function for getting the same results there, complete with gross hacks for turning the measurement into human-readable form. I made this code, and I am unapologetic. Witness my cobbled-together StackOverflow-sourced kludge.
function fish_prompt --description 'Write out the prompt' # Save the last status set -l last_status $status # Calculate the command duration if available set -l cmd_duration "" if set -q CMD_DURATION # Convert milliseconds to microseconds for more precise comparison set -l duration_us (math "$CMD_DURATION * 1000") # Calculate different time units set -l us (math "$duration_us % 1000") set -l ms (math "floor($duration_us / 1000) % 1000") set -l s (math "floor($duration_us / 1000000) % 60") set -l m (math "floor($duration_us / 60000000) % 60") set -l h (math "floor($duration_us / 3600000000)") # Format duration string if test $h -gt 0 set cmd_duration (string join '' "(" $h "h" $m "m)") else if test $m -gt 0 set cmd_duration (string join '' "(" $m "m" $s "s)") else if test $s -ge 10 set -l fraction (math "floor($ms / 100)") set cmd_duration (string join '' "(" $s "." $fraction "s)") else if test $s -gt 0 set cmd_duration (string join '' "(" $s "." (printf "%03d" $ms) "s)") else if test $ms -ge 100 set cmd_duration (string join '' "(" $ms "ms)") else if test $ms -gt 0 set -l fraction (math "floor($us / 100)") set cmd_duration (string join '' "(" $ms "." $fraction "ms)") else set cmd_duration (string join '' "(" $us "us)") end end # Define unicode symbols for status set -l checkmark "✓" set -l cross "✗" # Colors set -l normal (set_color normal) set -l dark_gray (set_color 555555) set -l blue (set_color -o blue) set -l red (set_color red) set -l green (set_color green) set -l purple (set_color -o purple) # First line echo # New line echo -n -s $dark_gray "["(date +%T)"] $last_status " # Time in brackets and exit status # Status indicator with exit status if test $last_status -eq 0 echo -n -s $green $checkmark else echo -n -s $red $cross end # Actually echo the duration echo -n -s $dark_gray " $cmd_duration" # Do the rest of the prompt echo set -l host_color $purple echo -n -s $host_color $USER "@" (prompt_hostname) $normal ":" $blue (prompt_pwd) $normal " $ " endA splash of color
Spending my formative years immersed in ANSI BBS graphics has probably made me a little more fond of colorful text in my terminal than the average frumpy, button-downed admin. Look, I know some folks feel that syntax highlighting and colors in general kill comprehension and encourage skimming, but what can I say? I love them and rely on them. Perhaps I skim too much, but so be it. You can take my colorful shell tools from my cold, dead hands.
To that end, I lean on a little program called GRC (for Generic Colorizer) to add highlighting and coloration to other tools. It’s broadly available and works without any additional configuration.
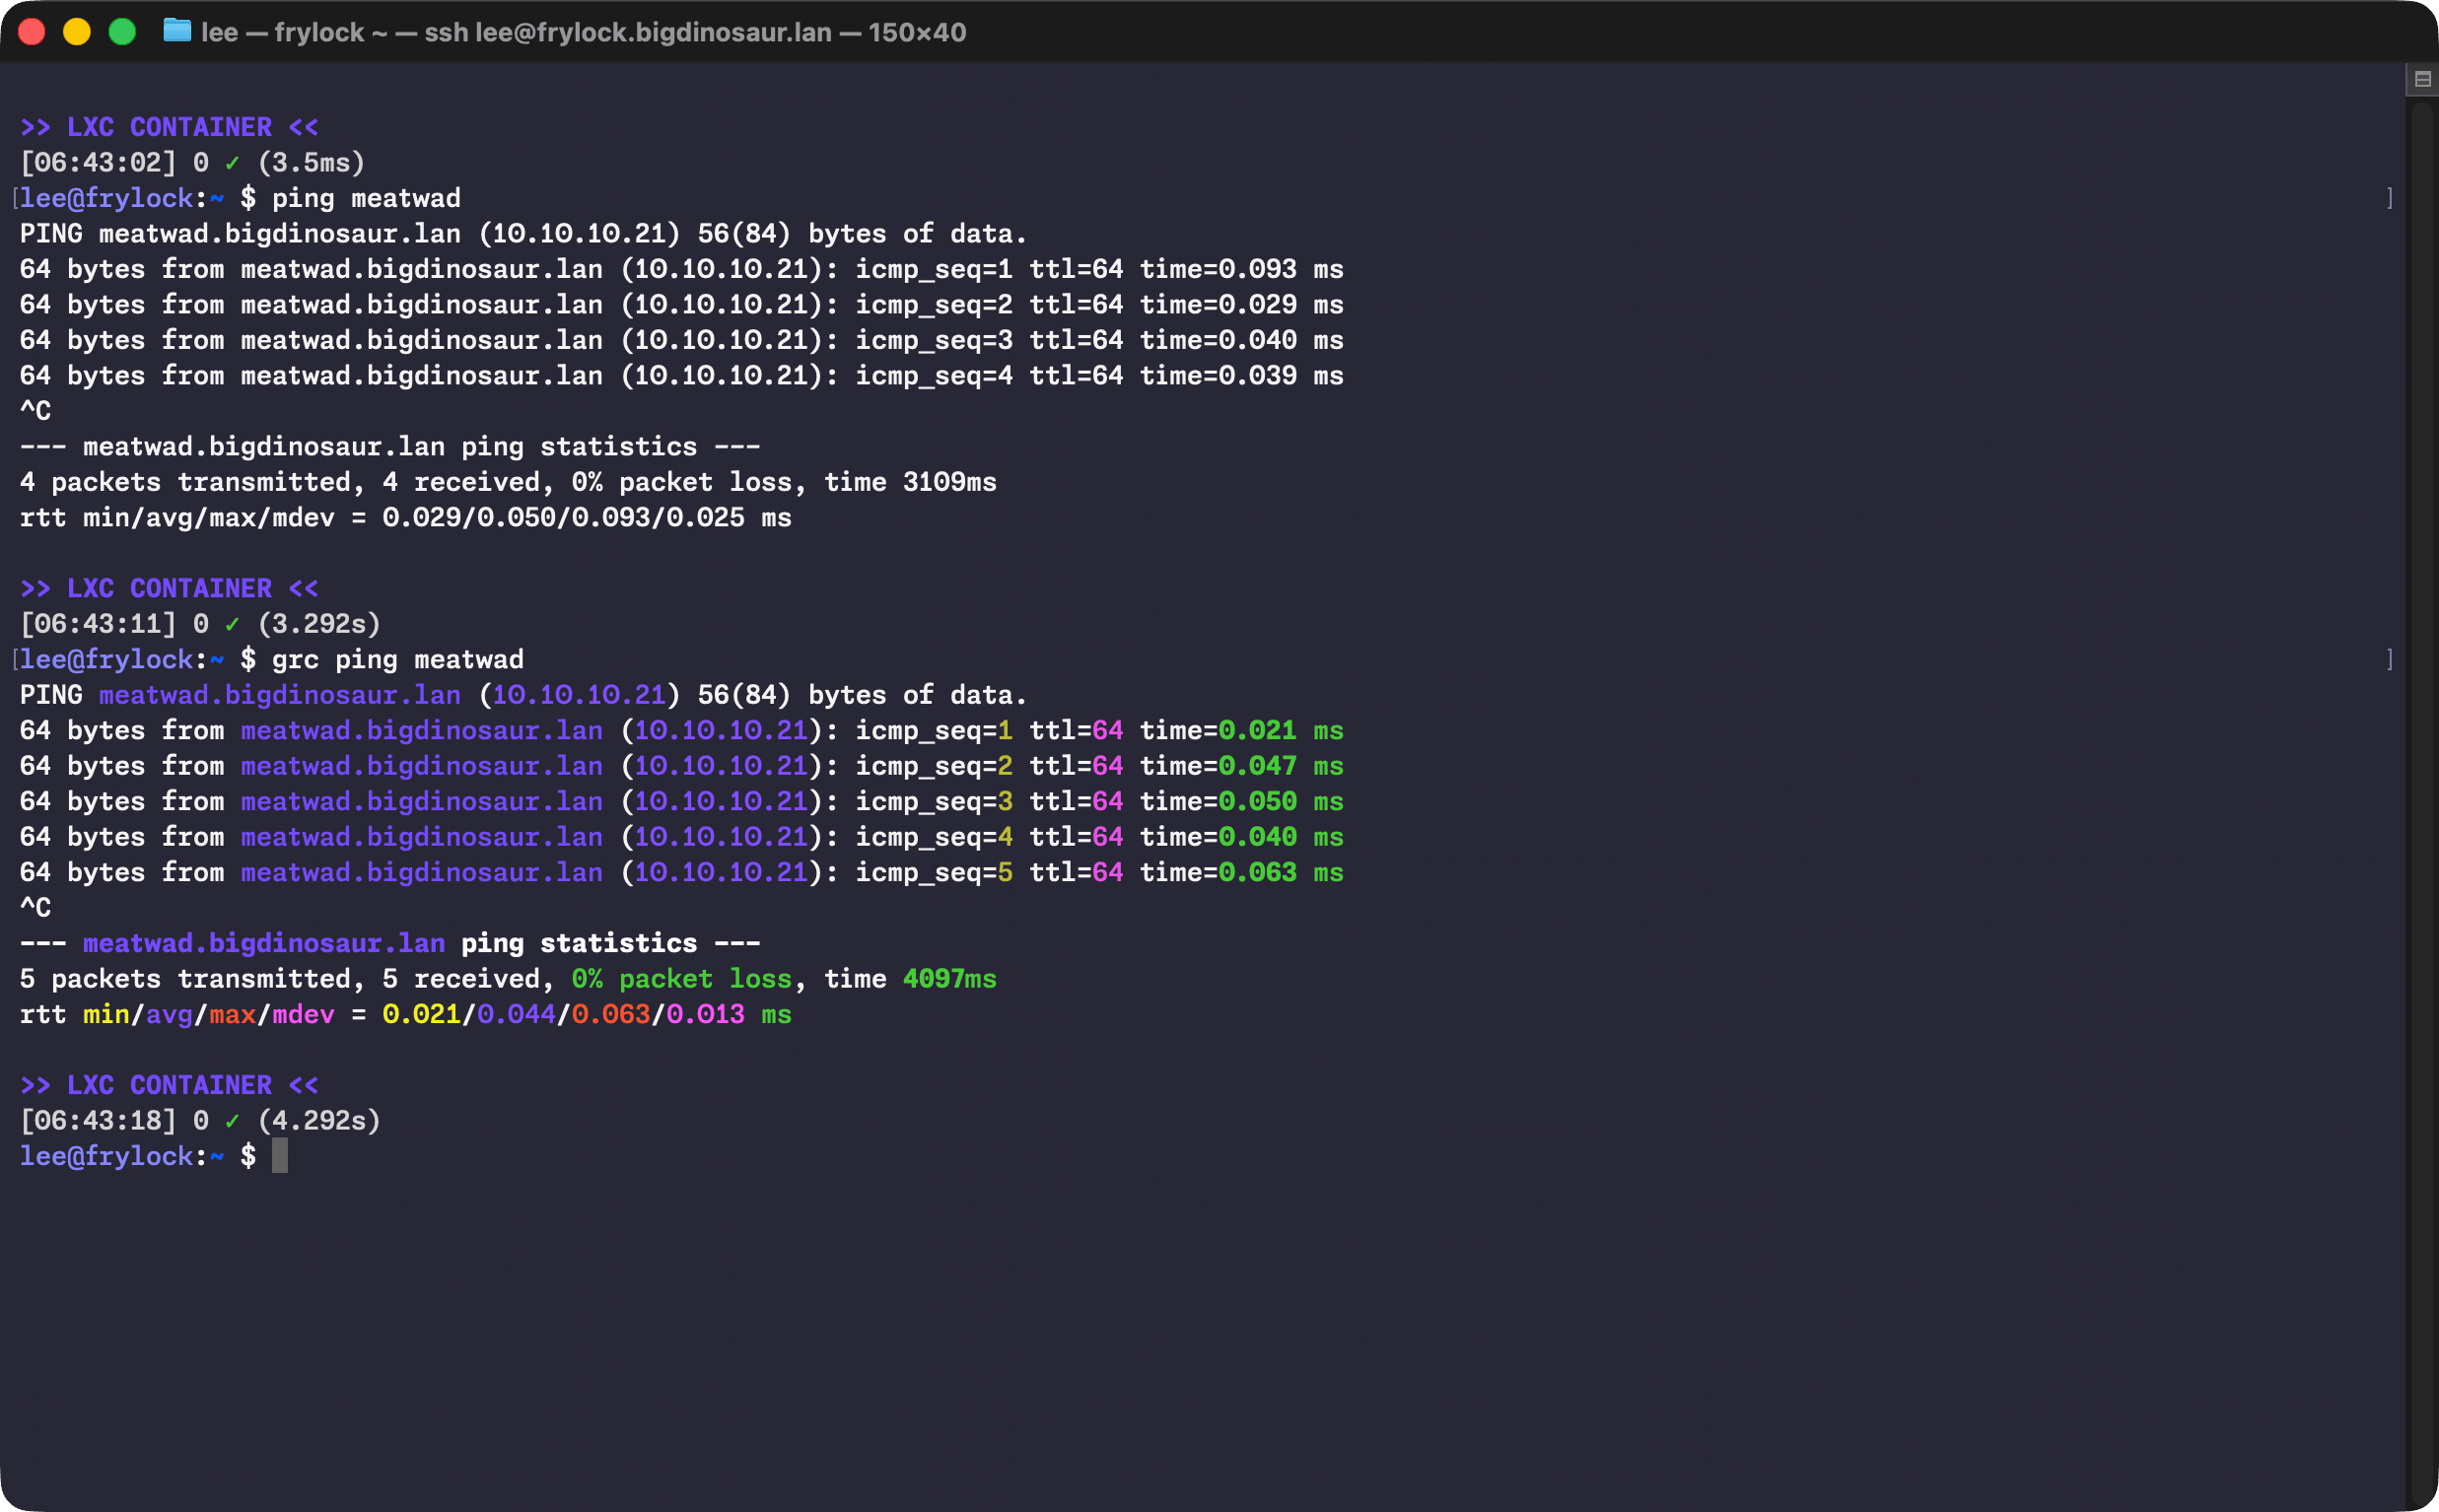
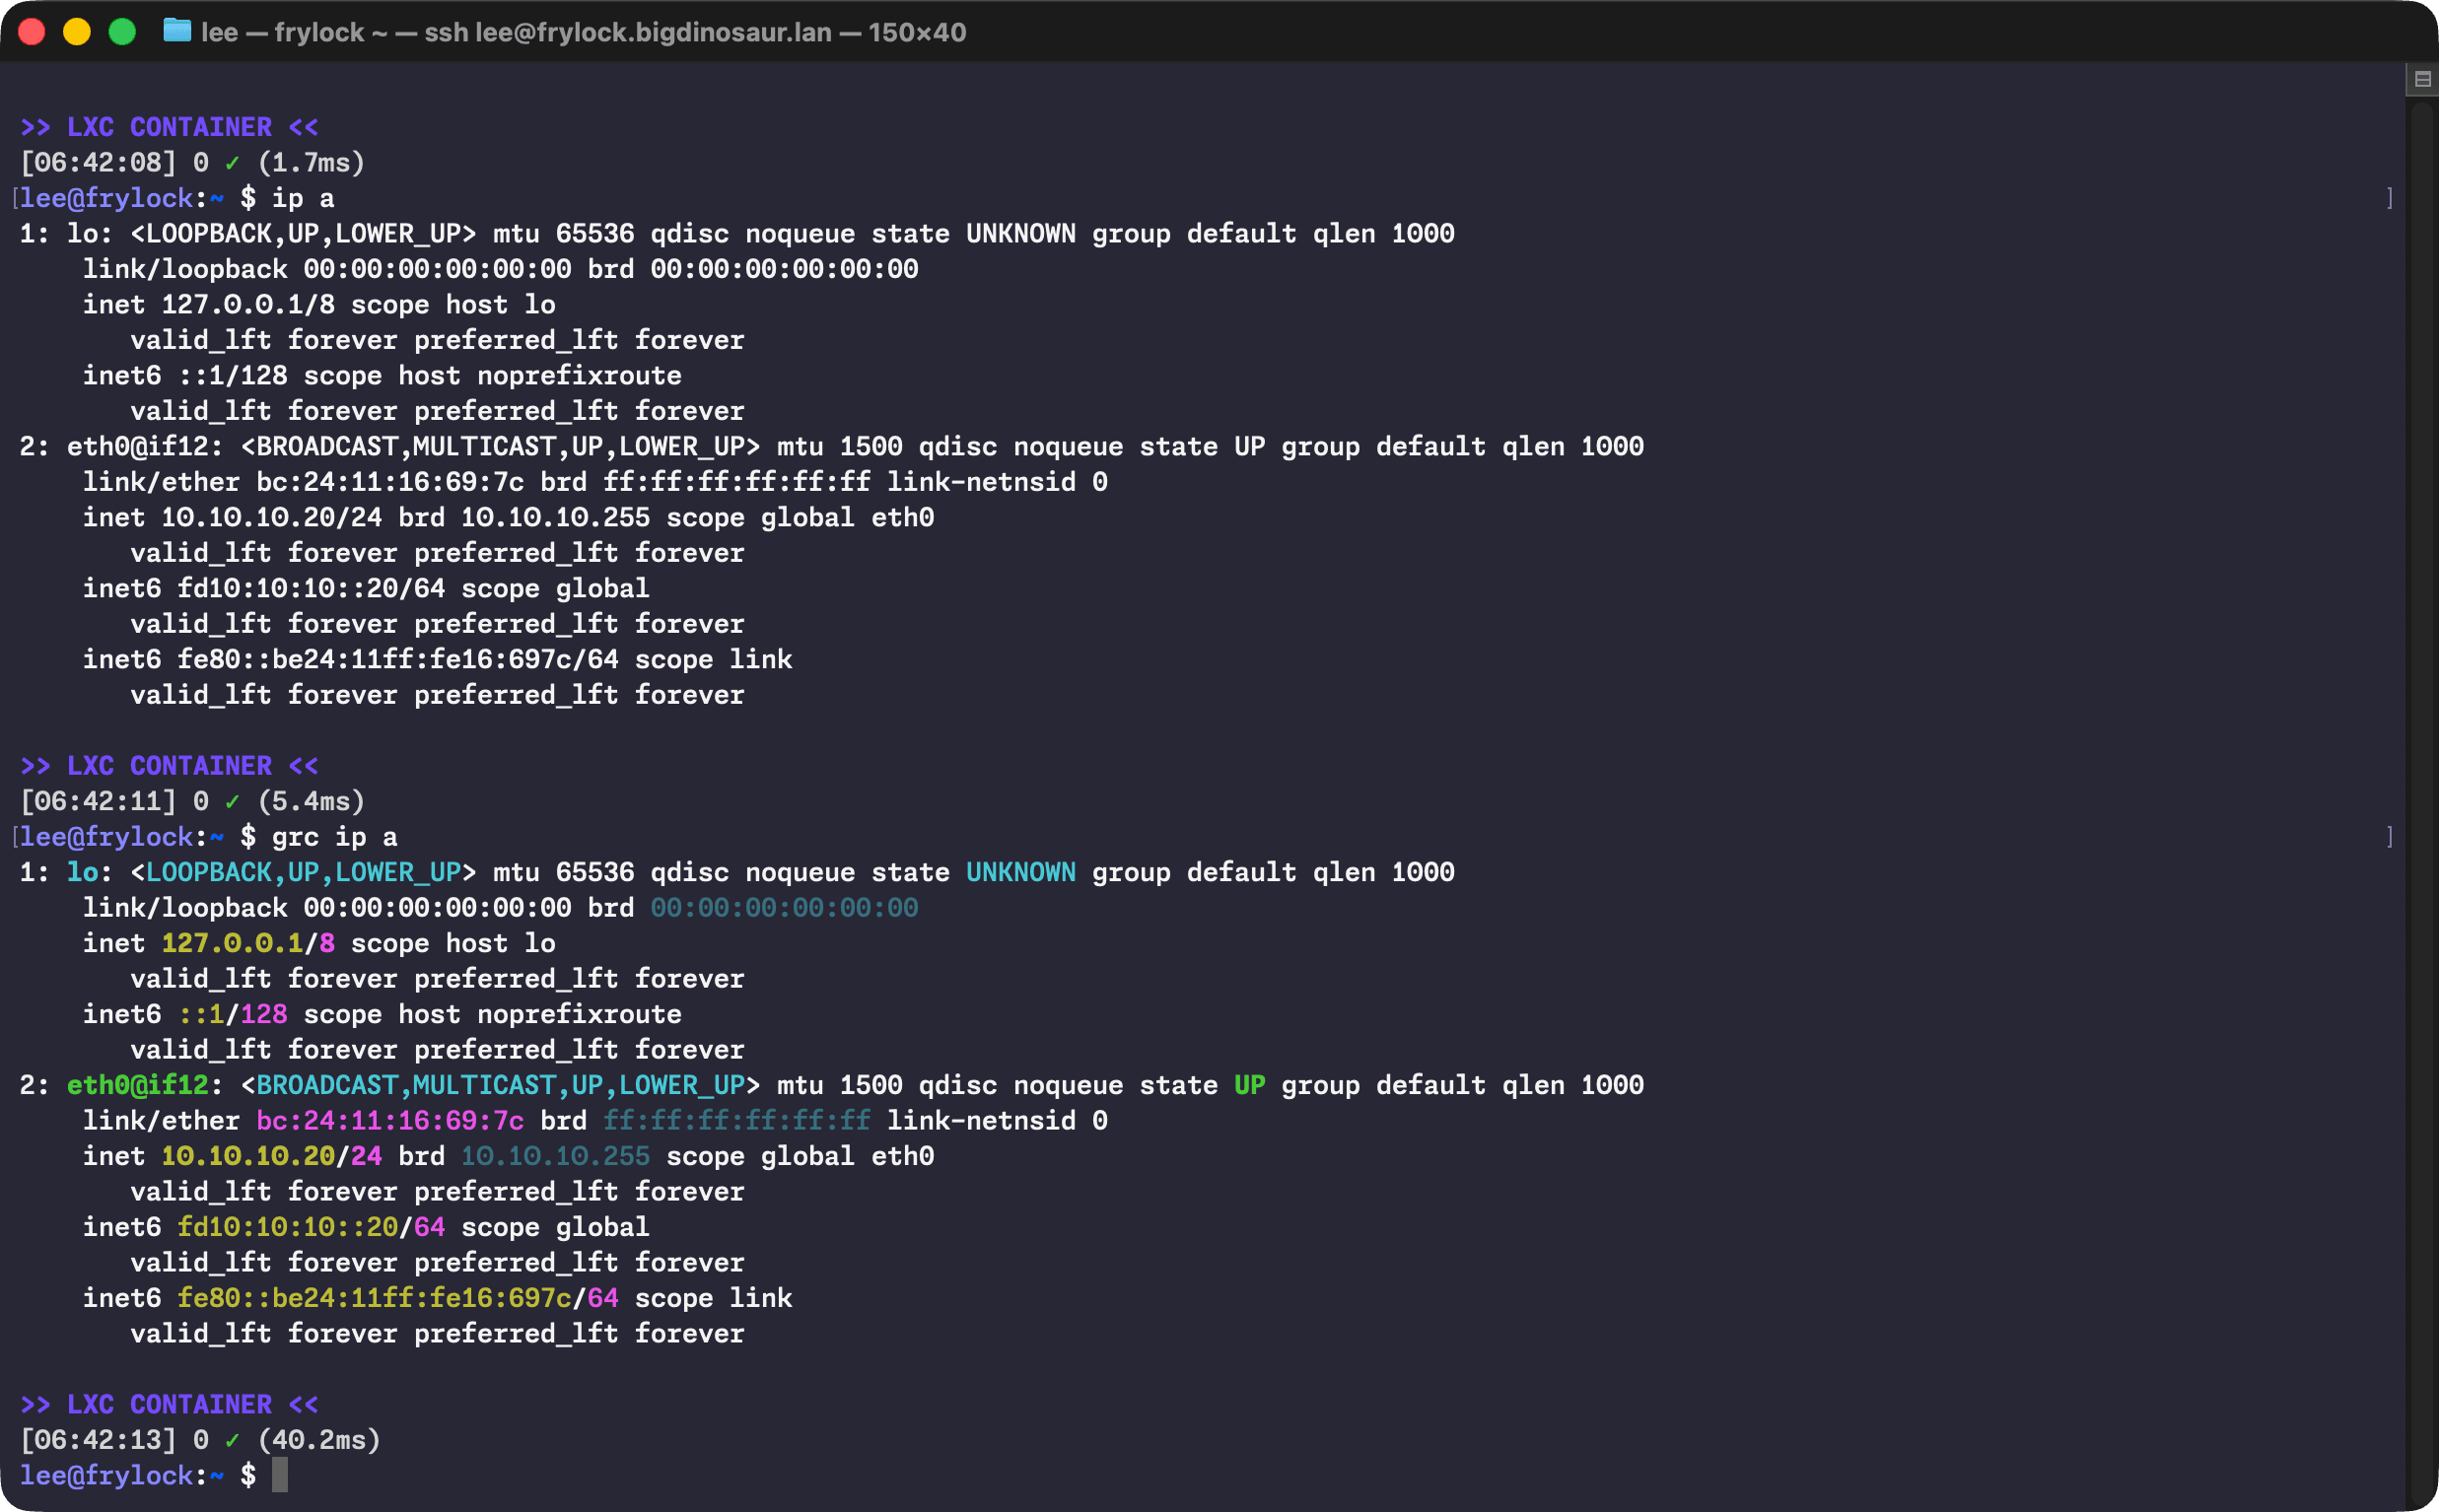
There’s a bit of aliasing (which I keep in .bash_aliases like a good citizen) to make colorful output the defaults on some common commands:
alias ls='ls --color=auto' alias ll='ls -AlFh --group-directories-first' alias df='grc df -h' alias du='grc du -h' alias free='grc free -h' alias ping='grc ping' alias traceroute='grc traceroute' alias ip='grc ip'I’m also a big fan of making my numbers human-readable, and the -h switch is therefore applied liberally.
(Do note that wrapping commands like ip in GRC can sometimes do weird things if you’re piping its output into something else. Use caution. Or don’t! It’s your computer, knock yourself out!)
The terminal itself
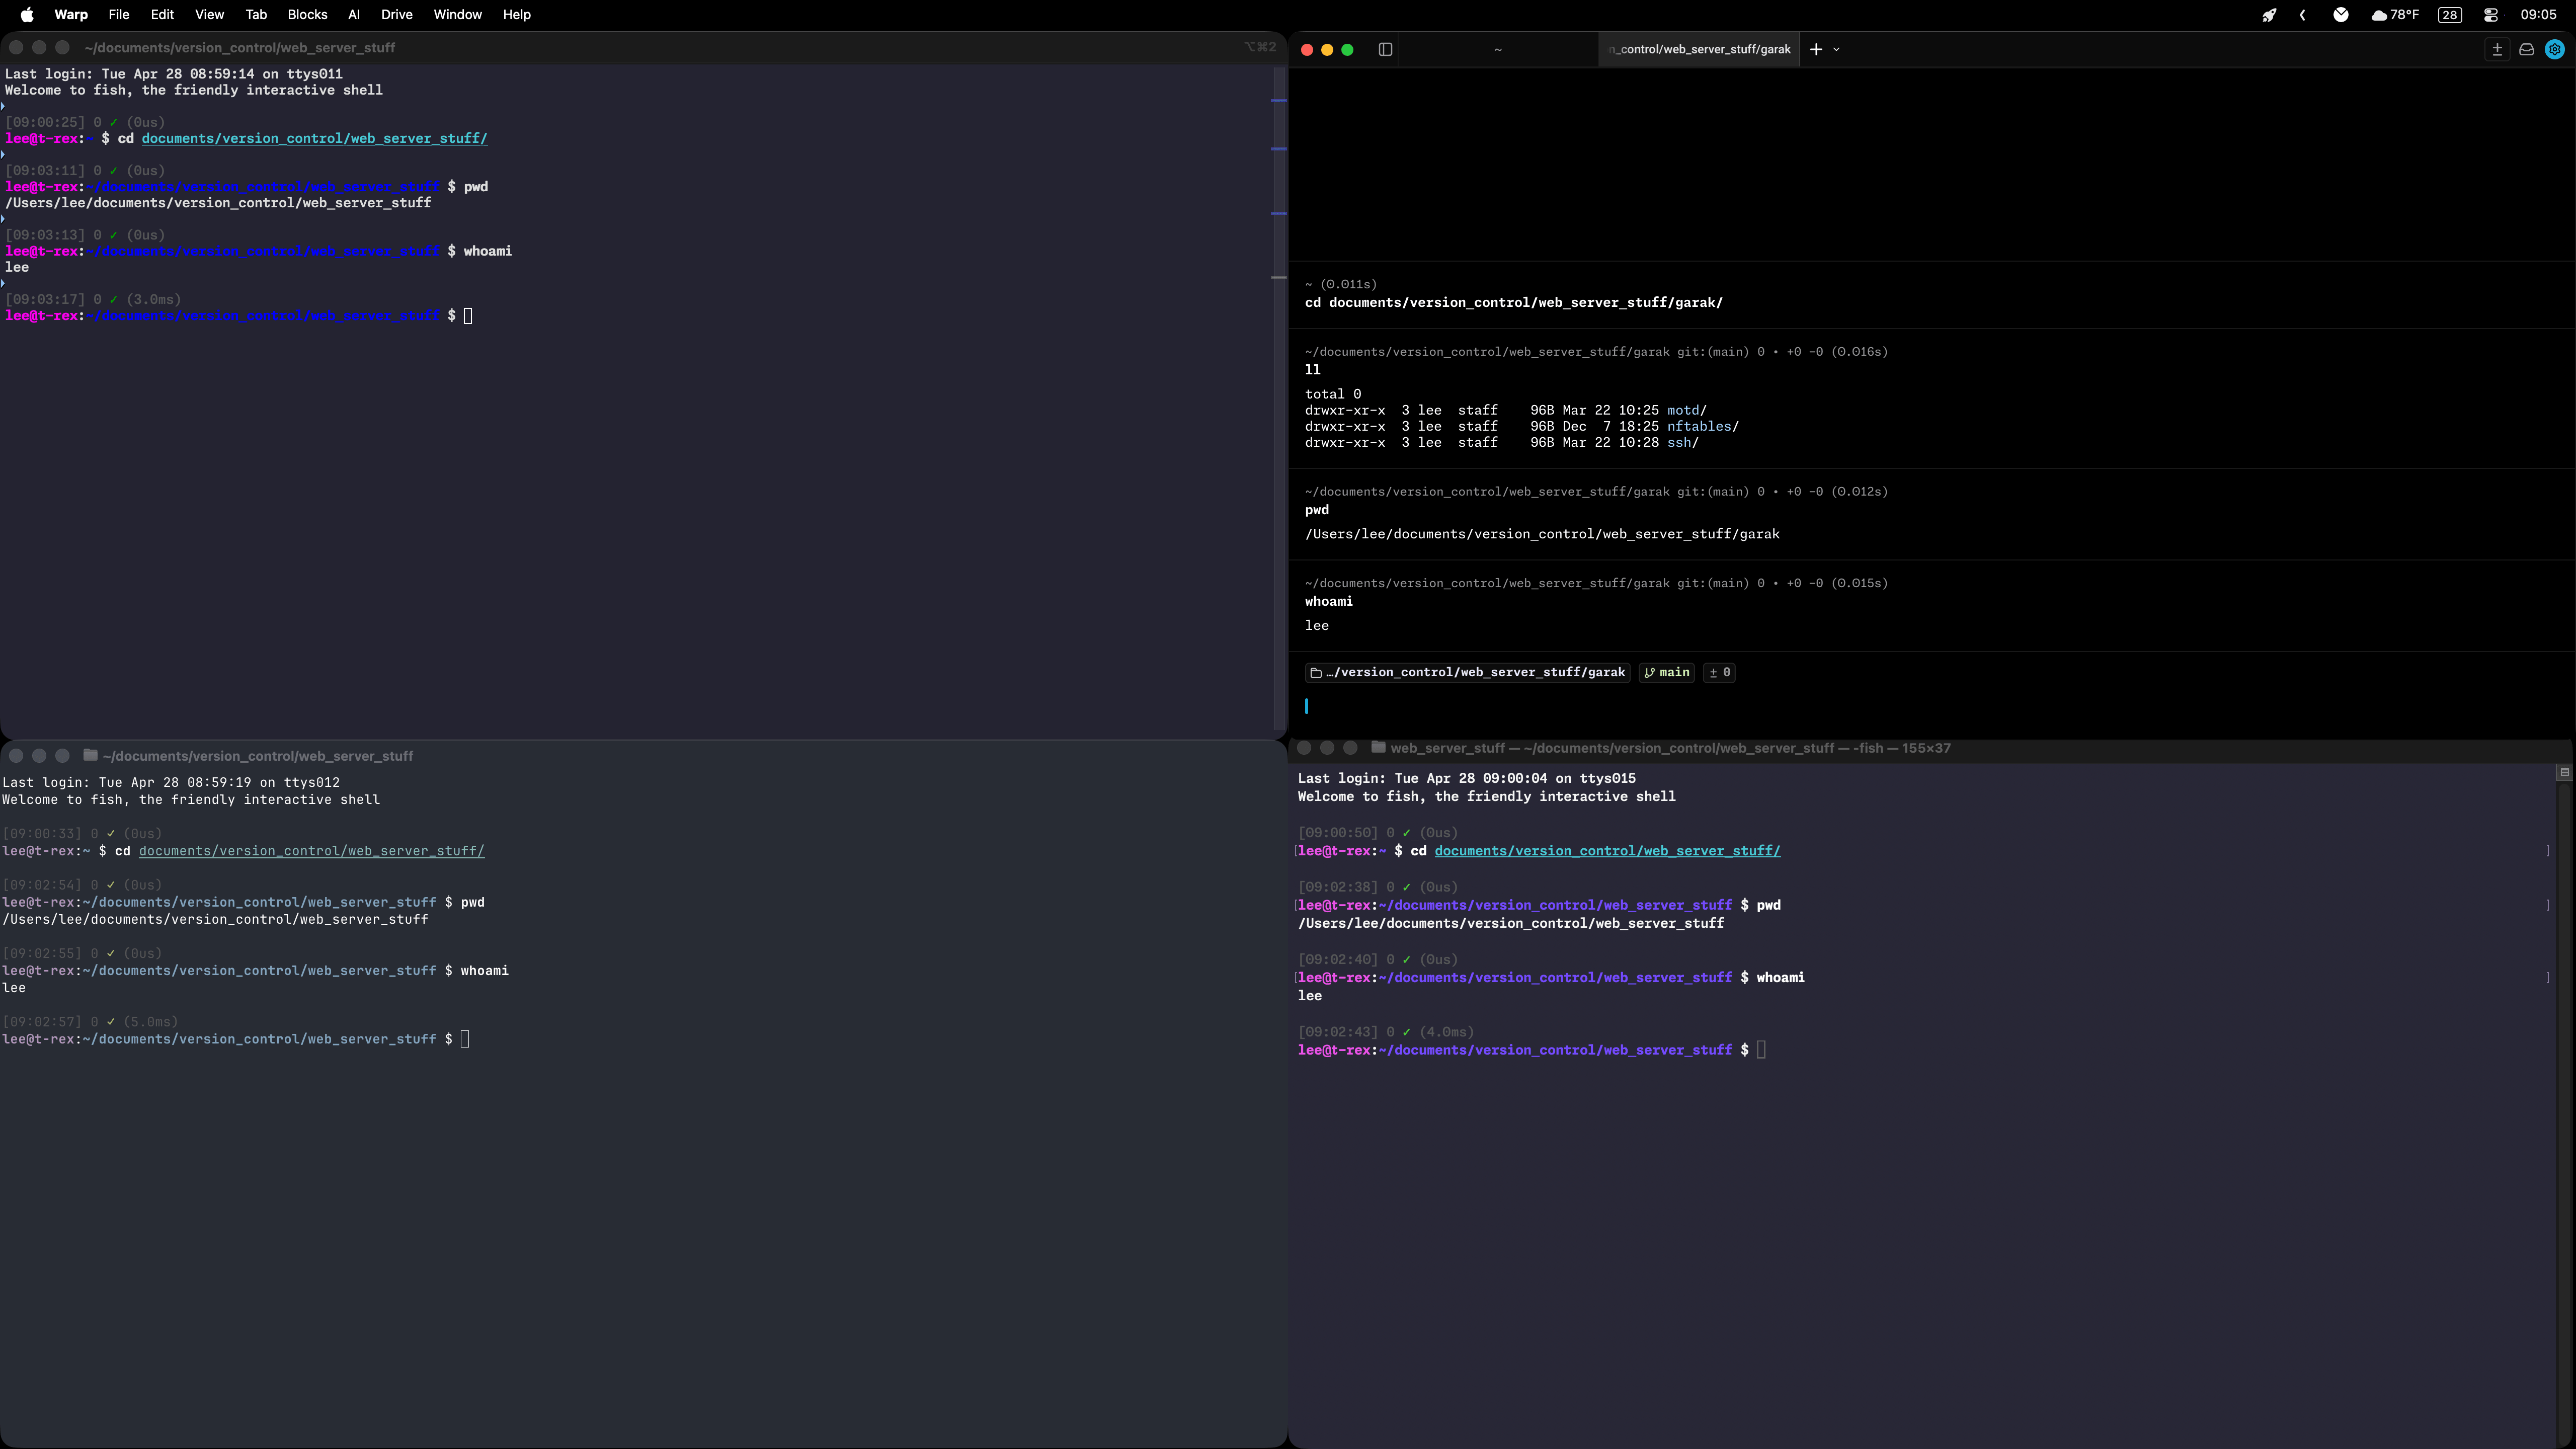
Sharp-eyed readers will note from the screenshots that I’m using MacOS’s Terminal.app for my terminal program, despite there being far better options. I suppose the excuse I have is that I’m comfy with Terminal.app and nothing has pulled me off of it. I’ve test-driven the usual suspects—Ghostty, Alacritty, the mighty iTerm2 with its awesome tmux windowing integration, and even fancy new reinterpretations of the terminal experience like Warp.
But I just can’t find a reason to switch that sticks with me. Changing terminal applications inevitably means things look different—ANSI colors are reinterpreted or mapped oddly, highlighting uses different tones, or a blue I’m particularly fond of is suddenly a different blue, and I have to spend 20 minutes fiddling with ANSI escape sequences to try to make it match again. Life’s too short for that.
If I were a smarter and more advanced terminal user—the kind who employs Vim mode to expertly pluck things from my command history via laser-focused artisanal regexes instead of piping history through grep like a caveman while frantically trying to figure out what the hell Past Lee was thinking—then maybe something like Ghostty would be a natural fit. Or iTerm, if I could ever actually make the mental leap, commit to tmux, and ascend to terminal godhood.
I can at least take some solace in knowing that I’m not alone down here in the mud, as Ars High Tech Priest Jason Marlin and I found out while discussing this article:
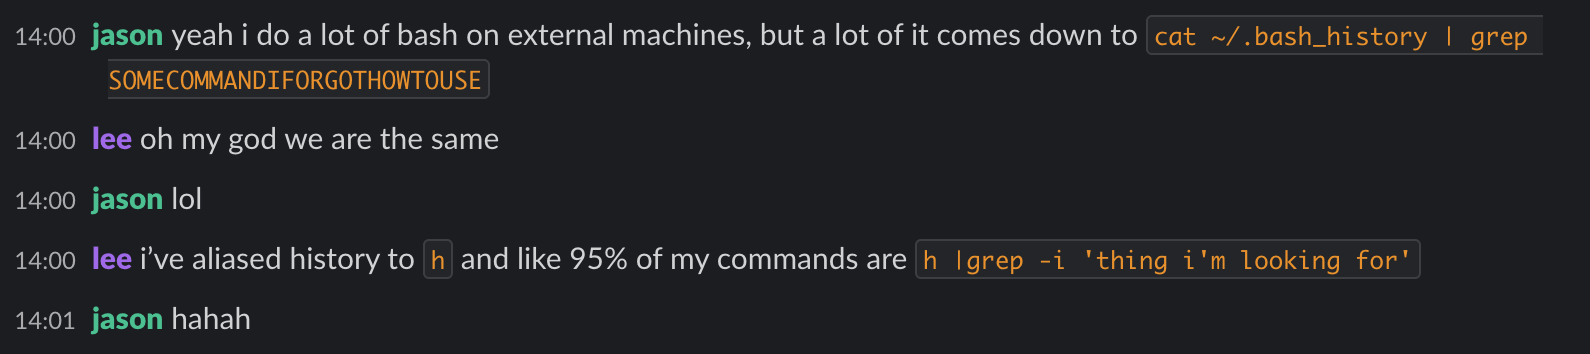

Apotheosis, it seems, will have to wait.
A brief bonus section on Vim
The path that led me to the terminal also led me to my side in the editor wars, and as might be expected, I worship at the Church of vi (or at least at its Protestant-esque offshoot, the Church of Vim). As with Terminal.app, it’s a relationship dependent primarily upon inertia rather than anything like love. Vim and I have reached an acceptable détente.
But getting there required a lot of frustrated searching and yelling at old StackOverflow posts. One thing that makes Vim comfortable for me is the combination of Vim-Airline and Promptline, which together provide a nice status bar that helps highlight some useful info as one is editing a file.
I also prefer to tweak the color that the Ubuntu-flavored version of Vim uses to denote comments, as the maintainers changed it from a dark blue to a cyan-y light blue some years back, and that annoyed me. Targeting that specific color and making the changes stick actually turned into a legitimate adventure, with Ars alum Jim Salter finally cracking the code on exactly what file to edit (hint, it was not .vimrc!). The linked article should make for fun reading if you want to spelunk through Vim’s coloration guts. (And shout out to Jim!)
Of course, now that I’ve mentioned .vimrc, we have to see what’s in there, too:
syntax on set hlsearch "Highlight search results set ignorecase "Ignore case while searching... set smartcase " ...unless search includes mixed case set gdefault "Substitutions are automatically global set colorcolumn=80 "Highlight column 80 set linebreak "Wrap whole words imap gj imap gk nmap gj nmap gk filetype plugin indent on set tabstop=4 set softtabstop=4 set shiftwidth=4 set expandtab highlight MatchParen ctermbg=black guibg=black highlight MatchParen cterm=underline gui=underline set guifont=Menlo for Powerline " air-line let g:airline_powerline_fonts = 1 if !exists('g:airline_symbols') let g:airline_symbols = {} endif " unicode symbols let g:airline_left_sep = '▶' let g:airline_right_sep = '◀' let g:airline_symbols.linenr = '␊' let g:airline_symbols.branch = '⎇' let g:airline_symbols.paste = 'ρ' let g:airline_symbols.whitespace = 'Ξ' " airline symbols let g:airline_left_sep = '' let g:airline_left_alt_sep = '' let g:airline_right_sep = '' let g:airline_right_alt_sep = '' let g:airline_symbols.branch = '' let g:airline_symbols.readonly = '' let g:airline_symbols.linenr = '' Briefly:
- First, we enable syntax highlighting always.
- The next three lines modify Vim’s search behavior, making all-lowercase searches case-insensitive but keeping mixed-case searches case-sensitive and highlighting all the search results at once.
- The
gdefaultline makes substitutions global by default, which works for me because that’s almost always what I want when I’m doing substitutions. - Next,
colorcolumnlights up column 80 so I can be mindful of width where I need to be. - The
linebreaksetting forces Vim to do line wrapping with whole words instead of just starting a new line in the middle of things. - The four
imapandnmaplines make the arrow keys move the cursor up and down in both normal and insert mode via display lines rather than the actual file lines, which really helps with arrow key navigation with long wrapping lines. (I know, I know, the real fix is to ditch this crutch and get better at Vim, but eh.) - The
filetypeline makes Vim aware of file types and that some file types might have specific plugins in the plugins directory, which they do. - The four
setlines enforce my preferred tab orthodoxy—four spaces, with tab and backspace both aware of this. - The last two
highlightlines alter the way Vim highlights matching parentheses by changing the highlight method to an underline instead of a big full-height cursor-emulating block. The default behavior looks so much like the terminal default cursor that it often makes me lose visual track of the actual cursor, whereas the underlining does not. - Finally, the last half is all Airline/Powerline stuff. You can ignore those, especially the section with the broken glyphs (they’re not broken when you have the right typeface installed!) unless you want to crib my specific Airline special character config.
A very short word on fonts
I’m a huge fan of the Monaspace family of typefaces for use in one’s terminal, and I love and use Monaspace Neon—it features in all the terminal screenshots in this piece. I know terminal fonts are about as personal as picking a brand of underwear, but after literal decades of trying various options, Monaspace Neon is the closest I’ve ever come to finding a typeface that approximates my monospaced platonic ideal. Your mileage will vary, of course, but I like it, I use it, and I feel that stumbling on it has meant the end of a career’s worth of searching.
Share your terminal tricks in the comments!
I can’t claim to have thought up any of the customization in this article. The pieces have accreted over time, gobbled up from years and years of StackExchange posts and Reddit threads. Whenever I saw a neat thing, I’d copy the code and try it out. And now you can do the same if any of this is useful to you.
But this, finally, brings us to the whole point of the article—what are your cool terminal tricks and hacks? We’d love to see how you rock the command line, from carefully cultivated Neofetch login splashes to fully from-scratch terminal replacements, and all points in between. We’ll promote the best stuff below the article for everyone to see.
So share! Share your terminals with us, and let us all rejoice, for we are here in the post-GUI era, and it’s nowhere near as scary as I used to think it would be. At least the colors are nice.


